Post-Processing: Creating Inundation Maps with very Large Terrain
Written by Chris Goodell | February 10, 2016
We often have to deal with very large models covering hundreds of river miles. The terrain data associated with these models can be equally massive, which can cause memory/processor issues when trying to delineate inundation maps.
This post is not concerned with pre-processing our model geometry. Instead, we have a completed model with results we are happy with, and now we want to make inundation shapefiles. This is often necessary when completing dam breach analyses/flood analyses/etc.
There are typically two ways in which flood inundation shapefiles are created: (1) using HEC-GeoRAS and (2) RAS Mapper. Both methods can face uphill battles when terrain data begin to exceed 20-30 gigabytes, depending on performance characteristics of your computer. Below are some typical errors you may see when trying to create inundation shapefiles with RAS Mapper on very large terrain.
Figure 1: RAS Mapper Memory Error Messages
There
IS a way to get around this using RAS Mapper. The first thing you’ll need to do is
Clip your terrain into smaller, more manageable pieces using your favorite GIS software. In this example I’ve used ArcGIS. In ArcMap, it is easy to clip terrain using a clipping shapefile and the Clip tool under Data Management > Raster > Raster Processing. For this example, I’ve clipped my terrain into 12 terrain pieces.
Figure 2: Clipped Terrain over Columbia and Deschutes Rivers downstream of John Day Dam
You may find (as I did), that your initial terrain splitting will not be quite enough, so you may have to complete this step again.
Next: Use RASMapper to convert ALL of your DEM pieces into terrain usable by RAS. Make sure all of your DEM pieces are in the project’s projected coordinate system.
If converting ESRI grids to RAS terrain, any of the many files that make up the ESRI Grid can be chosen by the terrain creator window:
Figure 3: ESRI Grid file format
Figure 4: Clipped ESRI Grids converted to RAS terrain using RAS Mapper (look at all of those terrain files!)
Figure 5: Creating RAS terrain layers in RAS Mapper
The next steps will have to be repeated for as many terrain pieces as you have. Start by associating the first terrain piece to the results of the plan you wish to map (Right click on Results in the Layer Manager in RAS Mapper > Manage Geometry Associations):
Figure 6: Associating terrain layers with geometry and results in RAS Mapper
Make sure that RASMapper has mapped the depth grid (or any other result) over that terrain piece before proceeding. You may have to click inside the RASMapper window and pan around to get the map to update.
Figure 7: Note that the depth grid is plotted over the correct terrain piece.
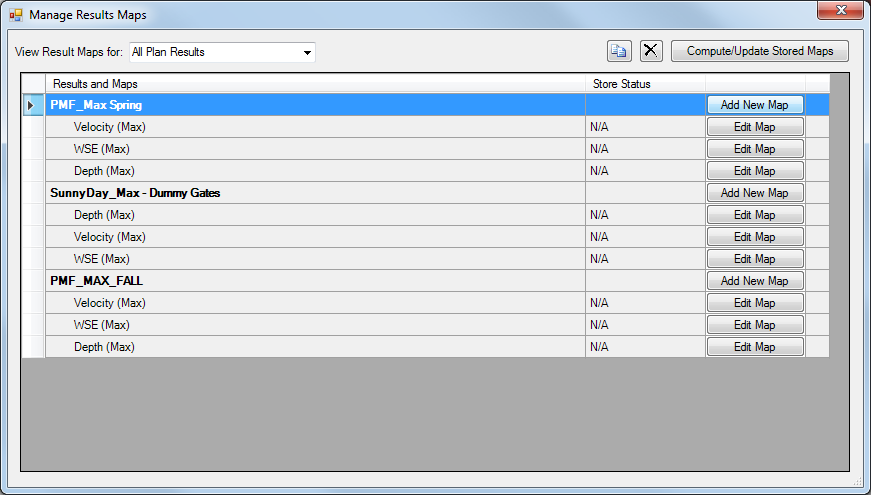
Next, right click on Resultsin the Layer Manager in RAS Mapper, and select Manage results maps.
Figure 8: Manage Results Map Menu in RAS Mapper
If you have more than one plan’s results in the menu, make sure to choose the plan or plans that you are interested in mapping. Select Add New Map from the menu. Choose Depth or Inundation Boundary as your Map Type, a Maximum Profile from the Unsteady Profile Menu, and Polygon Boundary should be set to 0. You can name the Layer anything you would like, although naming it something similar to your terrain piece would be helpful. Click Add Map.
Figure 9: Results Map Parameters Menu in RAS Mapper
We’re not finished yet, RAS Mapper still has to Compute the map properties and create the shapefile. In RAS Mapper, Right Click on the added map and choose “Compute/Update Stored Map”.
Figure 10: We have to tell RAS Mapper to compute the added maps/inundation shapefiles
This is where you will figure out whether or not your terrain pieces are small enough. If the terrain pieces are still too large, you may get one of the error messages shown above. If you succeed in creating your inundation shapefile, repeat this process until you have created shapefiles for all of your terrain pieces.
Once all of the inundation shapefiles have been completed, return to your favorite GIS software and add the inundation polygons to your map.
Figure 11: Unmerged inundation shapefiles.
Note: In the above figure, there are some split channels that are not included in the inundation. This may be caused by errors in the model or the terrain extent may not be large enough for the inundation. Prior to completing the next step, ensure that all of your individual pieces are correct. For this analysis, we were not concerned with this section of the inundation so it was not addressed.
Next, merge the polygons to create one large polygon. In ArcGIS, the Merge tool under Data Management > General in the Toolbox can be used to easily merge the shapefiles.
Figure 12: Merging Inundation Shapefile Pieces
You have now created an inundation shapefile over a very large area and can proceed to make detailed inundation maps for your project.
Figure 13: Finished Product





Comments
The comments are closed.